What to Do After Replacing Crankshaft Sensor
 Dr. Benjamin Foster
Published:December 19, 2023
Replacing the crankshaft sensor in a vehicle is a crucial step in maintaining optimal engine performance. Once the replacement is completed, certain post-installation steps are necessary to ensure a seamless integration and to address any potential issues. This article will guide you through the recommended actions to take after replacing the crankshaft sensor, emphasizing the importance of thorough inspection and testing to guarantee the proper functioning of the sensor and the overall health of the vehicle's engine.
What to Do After Replacing Crankshaft Sensor
After replacing the crankshaft sensor, it's important to follow a few steps to ensure proper functionality and to address any potential issues.
Clear Error Codes
When replacing the crankshaft sensor in response to a fault code, it is crucial to utilize an OBD-II (On-Board Diagnostics) scanner for the purpose of eradicating any stored error codes within the vehicle's computer system. This step is integral in ensuring that the newly installed sensor is recognized by the electronic control module (ECM) without interference from previous fault indications. The OBD-II scanner facilitates communication with the vehicle's onboard diagnostics system, allowing for the identification and deletion of trouble codes that might have prompted the replacement of the crankshaft sensor in the first place.
By effectively clearing error codes, you not only provide a clean slate for the ECM to assess the performance of the new sensor but also enable the monitoring system to detect any fresh issues that may arise during subsequent operations. This diagnostic process aids in maintaining optimal engine efficiency and performance by preventing the persistence of outdated fault codes that could potentially mislead diagnosis efforts.
In essence, the use of an OBD-II scanner serves as a pivotal step in the post-replacement protocol, ensuring that the vehicle's computer is in sync with the updated sensor configuration and paving the way for accurate and reliable monitoring of the engine's health and functionality.
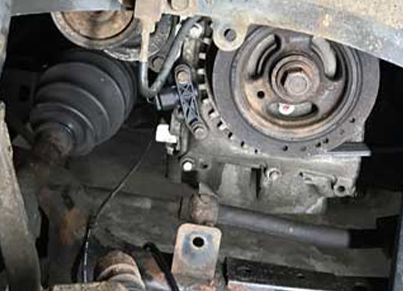
Inspect Wiring and Connectors
This step is a critical component of the post-replacement process for the crankshaft sensor, playing a pivotal role in ensuring the sustained functionality of the vehicle. This step involves a comprehensive examination of the wiring and connectors associated with the crankshaft sensor to identify and rectify any potential issues that could adversely impact sensor performance.
A visual inspection is the first order of business, with a keen focus on the wiring harness and connectors. This involves scrutinizing the entire length of the wiring for any visible signs of wear, fraying, or damage. Detecting and addressing these issues early on is paramount to prevent electrical malfunctions.
Corrosion poses a particular threat to electrical conductivity, especially in regions exposed to harsh environmental conditions. Therefore, a meticulous check for corrosion in the connectors is essential. Cleaning any corroded areas with an appropriate solution is a proactive measure to maintain optimal electrical connections.
Securing connections is another facet of this inspection. Ensuring that all connectors are firmly attached to their respective terminals guards against intermittent signals, preserving the accuracy of crankshaft sensor readings.
The examination extends to the internal components of the connectors, where pins should be scrutinized for bending, corrosion, or damage. Straightening bent pins and addressing corrosion issues are integral steps in maintaining reliable electrical connections.
Contaminants around the connectors, such as oil, dirt, or debris, can compromise performance. Cleaning the connectors as part of the inspection process helps eliminate these contaminants, contributing to a cleaner and more secure connection.
The careful routing and securing of the wiring's path, avoiding sharp edges or areas prone to pinching, is also emphasized in this inspection. Additionally, the application of dielectric grease to connector terminals can safeguard against moisture and corrosion, provided it is applied judiciously.
For those equipped with a multimeter, a resistance check on the wiring is recommended to ensure there are no breaks or excessive resistance. Consulting the vehicle's service manual for specific resistance values is advisable.
In essence, the meticulous inspection of wiring and connectors serves as a proactive measure, contributing to the longevity and accuracy of the crankshaft sensor's operation.
Battery Disconnect/Reconnect
This step is a pivotal aspect of the sensor replacement process, particularly in scenarios where certain sensors necessitate a temporary interruption of electrical power. This precautionary measure is designed to ensure safety during the replacement procedure and to facilitate the successful integration of the new sensor into the vehicle's electrical system.
Certain vehicle models mandate the disconnection of the battery before replacing specific sensors. This practice serves multiple purposes, primarily enhancing safety by minimizing the risk of electrical shocks and short circuits during the sensor replacement. By disconnecting the battery, the flow of electrical current through the vehicle's circuits is interrupted, mitigating potential hazards associated with live electrical components.
Once the sensor replacement is completed, the subsequent step involves the careful reconnection of the battery. This restoration of power is critical for the initiation of the vehicle's electronic control module (ECM) and the seamless integration of the new sensor data into the overall system. It allows the ECM to recognize the changes, reset certain parameters, and establish communication with the replaced sensor.
Check Timing
Verifying the timing is a crucial step, especially when the crankshaft sensor is an integral component of the timing system. This step ensures that the synchronization between various engine components is precise and aligns with the manufacturer's specifications. The timing system, which includes the coordination of the crankshaft and camshaft positions, plays a fundamental role in engine operation.
When the crankshaft sensor is part of the timing system, it actively contributes to the accurate timing of fuel injection and ignition events. If the timing is not set correctly, it can lead to a host of issues ranging from poor engine performance to potential damage.
To check and adjust the timing, it's often necessary to consult the vehicle's service manual, as different engines and models may have specific procedures. This may involve using timing marks on the crankshaft pulley and camshaft sprocket, along with proper alignment tools. In some cases, a timing light may be utilized to ensure that ignition timing corresponds precisely to the manufacturer's specifications.
Perform a Test Drive
Taking the vehicle for a test drive serves as a real-world evaluation of the crankshaft sensor's performance. During the test drive, pay close attention to various aspects of engine behavior, including acceleration, idle, and overall performance.
Acceleration: Test the vehicle's acceleration across different speed ranges. Ensure that the acceleration is smooth and responsive. Any hesitations, stumbles, or irregularities in power delivery may indicate issues with the crankshaft sensor or related components.
Idle Quality: Pay careful attention to the engine's idle behavior. A properly functioning crankshaft sensor contributes to stable and consistent idling. An irregular or rough idle could be indicative of sensor-related problems or other issues affecting engine control.
Overall Engine Performance: Evaluate the overall performance of the engine under various driving conditions. Check for any unusual noises, vibrations, or warning lights on the dashboard. Any abnormal behavior should be investigated further to identify and address potential issues.
Transmission Shifts (if applicable): If your vehicle is equipped with an automatic transmission, observe the shifting behavior during the test drive. Smooth and timely shifts contribute to a well-functioning drivetrain.
Check for Warning Lights: Keep an eye on the instrument cluster for any warning lights that may illuminate during the test drive. If any warning lights persist or new ones appear, it could signal unresolved issues that need attention.
Monitor for Warning Lights
Vigilantly monitoring the dashboard for warning lights is an essential step in the post-replacement process of the crankshaft sensor. This ongoing observation ensures that the vehicle's electronic control module (ECM) is responding positively to the new sensor and that there are no emerging issues.
Dashboard Warning Lights: Continuously observe the dashboard for any illuminated warning lights during and after the test drive. Warning lights may indicate various issues, and their prompt identification is crucial for proactive troubleshooting.
Check for New Codes: If error codes were cleared earlier using an OBD-II scanner, it is imperative to confirm that no new fault codes have been generated. The absence of new codes suggests that the crankshaft sensor replacement has been successful, and the ECM is not detecting any immediate problems.
Interpret Warning Lights: Different warning lights signify distinct issues. Common warning lights related to engine performance include the check engine light, which may illuminate if the ECM detects anomalies in sensor readings. Other lights, such as those related to the ABS or traction control systems, may also provide insights into potential issues.
Relearn Procedures
Some vehicles may require a relearn procedure after replacing certain sensors. This could involve driving the vehicle under specific conditions to allow the engine control module (ECM) to adapt to the new sensor.
Double-Check Installation: Ensure that the crankshaft sensor is properly installed and torqued to the manufacturer's specifications. Make sure any protective covers or shields are also in place.
Check for Oil or Coolant Leaks: Inspect the area around the crankshaft sensor for any signs of oil or coolant leaks. If there are leaks, address them promptly.
Consult the Service Manual: Refer to the vehicle's service manual for any specific post-installation procedures recommended by the manufacturer.
Address Any Remaining Issues: If you notice any issues during the test drive or after the replacement, address them promptly. If problems persist, consider seeking professional help or consulting with a qualified mechanic.
Why the Car Cannot Start After Replacing the Crankshaft Position Sensor

While replacing the crankshaft position sensor is often done to address starting issues, it's possible to encounter difficulties even after the replacement. Several factors could contribute to a car not starting after replacing the crankshaft position sensor.
-
Incorrect Installation: If the new crankshaft position sensor is not installed correctly, it may not provide accurate readings to the engine control module (ECM). Ensure that the sensor is aligned properly and securely seated.
-
Damaged Wiring or Connectors: Inspect the wiring and connectors associated with the crankshaft position sensor. Damage, loose connections, or faulty wiring can lead to erratic sensor readings or a lack of signal transmission.
-
Faulty New Sensor: While uncommon, it's possible to receive a defective replacement sensor. Perform a diagnostic check or try reinstalling the old sensor to see if the issue persists.
-
Timing Issues: If the replacement involved disturbing the timing components, such as the timing belt or chain, and the timing is not set correctly, the engine may not start. Verify that the timing is correctly aligned as per the manufacturer's specifications.
-
Battery Disconnection: If the battery was disconnected during the replacement process, the ECM might need time to relearn and adapt to the new sensor. Give the vehicle a few key cycles or perform a relearn procedure as specified in the service manual.
-
Air or Fuel Delivery Issues: A no-start condition could be related to problems with air or fuel delivery. Check the fuel pump, fuel injectors, and air intake components to ensure proper functioning.
-
Other Faulty Sensors: While replacing the crankshaft position sensor, other sensors or components may have been disturbed. Check for any fault codes related to other sensors and address those issues accordingly.
-
ECM Issues: If there are problems with the engine control module, it may not be receiving or processing signals from the new crankshaft position sensor correctly. Diagnostic tools can help identify ECM-related issues.
-
Ignition System Problems: Issues with the ignition system, such as a faulty ignition coil or spark plugs, can prevent the engine from starting. Ensure that the ignition components are in good condition.
-
Fuel System Problems: Insufficient fuel pressure or clogged fuel injectors can lead to starting issues. Check the fuel system components for any issues and perform a fuel pressure test if needed.
Does A New Crankshaft Sensor Have to Be Programmed
In general, a new crankshaft sensor does not need to be programmed or recalibrated. Crankshaft sensors are typically plug-and-play components, and once installed, they should function without the need for additional programming in most vehicles.
Crankshaft sensors work by generating signals based on the position of the crankshaft, and the information they provide is used by the engine control module (ECM) to manage various engine functions. The ECM should automatically recognize the new sensor and adapt its settings accordingly.
However, it's important to note that there are exceptions, and some specific vehicle models or engine management systems may require a relearn or calibration procedure after sensor replacement.
What Happens If You Don't Relearn Crankshaft Position Sensors

Not performing a relearn process after replacing the crankshaft position sensor can lead to various issues.
-
Engine Misfire
The engine control module (ECM) relies on accurate data from the crankshaft position sensor to precisely time fuel injection and ignition. If the sensor is not relearned, the ECM may have difficulty interpreting the signal correctly, leading to misfires. This can result in poor engine performance, rough idling, and reduced power.
-
Limp Mode or Reduced Power
Some vehicles have a failsafe mode, often referred to as "limp mode" or "reduced power mode." If the ECM detects irregularities or inconsistencies in sensor signals, it may limit the engine's power output to prevent potential damage. Failure to relearn the crankshaft position sensor could trigger this mode, especially during high RPM or heavy load conditions.
-
Emissions Test Failures
The misfire monitor is a crucial part of the vehicle's emissions control system. Without a proper relearn process, the ECM may not accurately monitor and control misfires. As a result, the vehicle might fail emissions tests due to incomplete or unsuccessful misfire monitoring, leading to increased emissions.
-
Fuel Efficiency Issues
Inaccurate sensor data can adversely affect the air-fuel mixture, combustion efficiency, and overall engine operation. This can lead to decreased fuel efficiency, potentially causing the vehicle to consume more fuel than necessary.
-
Long-Term Engine Damage
While less common, prolonged operation without a proper crankshaft position sensor relearn process may contribute to long-term engine damage. This is more likely in situations where misfires are persistent and the engine operates under suboptimal conditions.
Final Words
In conclusion, the post-replacement procedures following the installation of a new crankshaft sensor are paramount for the continued reliability and efficiency of the vehicle. From clearing error codes and inspecting wiring to checking timing and conducting a test drive, each step contributes to the overall success of the sensor replacement.
FAQ
Should you disconnect the battery when changing the crankshaft sensor?
The necessity of disconnecting the battery when changing the crankshaft sensor can vary based on the specific vehicle and its electronic control system. In some cases, disconnecting the battery may be recommended or necessary, while in other situations, it may not be required.
Do you need to calibrate a crankshaft position sensor?
In many cases, crankshaft position sensors do not require a separate calibration process. As you've mentioned, the typical procedure involves installing the new sensor, clearing any error codes stored in the Engine Control Module (ECM), and then conducting a test drive. In most situations, the ECM will automatically adapt to the new sensor's signals during normal vehicle operation.
However, it's crucial to note that there are exceptions, and specific vehicle models or engine management systems may have different requirements. Some advanced or specialized systems may necessitate a relearn or calibration procedure to ensure accurate data interpretation by the ECM.
What does a crankshaft sensor do?
A crankshaft position sensor monitors the position and speed of the crankshaft, providing crucial information to the engine control module (ECM). Its real-time data helps the ECM make critical decisions related to ignition, fuel injection, and other parameters, ensuring optimal performance, fuel efficiency, and emissions control in modern vehicles.
What happens if I disconnect the crankshaft sensor?
Disconnecting the crankshaft position sensor disrupts the crucial communication between the sensor and the ECU, leading to a lack of ignition timing control and fuel injection regulation. This can result in engine stalling, poor performance, and, in some cases, the inability to start the engine. It is generally not recommended to disconnect essential engine sensors unless required for diagnostic purposes, as it can adversely affect the overall operation of the vehicle.


FAQ
-
What happens if I disconnect the crankshaft sensor?
Disconnecting the crankshaft position sensor disrupts the crucial communication between the sensor and the ECU, leading to a lack of ignition timing control and fuel injection regulation. This can result in engine stalling, poor performance, and, in some cases, the inability to start the engine. It is generally not recommended to disconnect essential engine sensors unless required for diagnostic purposes, as it can adversely affect the overall operation of the vehicle.
-
What does a crankshaft sensor do?
A crankshaft position sensor monitors the position and speed of the crankshaft, providing crucial information to the engine control module (ECM). Its real-time data helps the ECM make critical decisions related to ignition, fuel injection, and other parameters, ensuring optimal performance, fuel efficiency, and emissions control in modern vehicles.
-
Do you need to calibrate a crankshaft position sensor?
In many cases, crankshaft position sensors do not require a separate calibration process. As you've mentioned, the typical procedure involves installing the new sensor, clearing any error codes stored in the Engine Control Module (ECM), and then conducting a test drive. In most situations, the ECM will automatically adapt to the new sensor's signals during normal vehicle operation.
-
Should you disconnect the battery when changing the crankshaft sensor?
The necessity of disconnecting the battery when changing the crankshaft sensor can vary based on the specific vehicle and its electronic control system. In some cases, disconnecting the battery may be recommended or necessary, while in other situations, it may not be required.


Still, need help? Contact Us: [email protected]