What To Do After Replacing Camshaft Sensor
 Dr. Benjamin Foster
Published:December 20, 2023
The replacement of a camshaft sensor is a critical step in maintaining the optimal performance and efficiency of your vehicle's engine. Once the new sensor is in place, there are essential post-replacement measures to ensure that everything functions seamlessly. This article will guide you through the necessary steps and precautions to take after replacing the camshaft sensor. Whether you've tackled the replacement yourself or had it done by a professional, understanding what to do next is crucial for the longevity and reliability of your vehicle.
What is a Camshaft Sensor
The camshaft sensor, also referred to as the cam position sensor, plays a crucial role as a precision positioning device for discerning cylinder positions in an internal combustion engine. The repercussions of a malfunctioning camshaft sensor on a vehicle are significant. A defective sensor can lead to ignition failures, making engine start-up challenging. When the Engine Control Unit (ECU) fails to acquire feedback information from the sensor, it disrupts the proper control of the engine's intake and exhaust systems, thereby compromising overall performance.
Beyond ignition issues and starting difficulties, a damaged camshaft sensor can trigger adverse effects. For instance, it may cause the vehicle's crankshaft to reverse during ignition, resulting in backfires within the intake manifold. Furthermore, the ECU's inability to access vital information can lead to erratic fuel injection, causing an increase in fuel consumption. The vehicle may also exhibit severe shaking, resembling the symptoms of a misfiring cylinder.
Typically, a failing camshaft sensor prompts the illumination of the engine fault light, signaling the issue to the vehicle operator through the dashboard's fault indicator light. This illumination serves as a prompt for the car owner to promptly undertake a comprehensive vehicle inspection and maintenance.
Under normal conditions, the camshaft sensor functions by transmitting cylinder operation data to the ECU. The ECU utilizes this information for sequential injection control, ignition timing control, and knock control. Additionally, in situations where the crankshaft sensor experiences a failure, the camshaft sensor can serve as a backup for emergency ignition.
In essence, the camshaft sensor is a critical component that ensures the smooth operation and performance optimization of an internal combustion engine. When it malfunctions, the consequences can span from ignition issues and starting difficulties to adverse effects on fuel efficiency and overall engine performance. Regular inspections and timely maintenance are essential to address and rectify any issues with the camshaft sensor, ensuring the vehicle operates at its optimal level.
What To Do After Replacing Camshaft Sensor
After replacing a camshaft sensor, there are a few steps you should take to ensure that the sensor is working properly and that your vehicle is running smoothly.
Clear Error Codes
Clearing error codes is an important step, especially after replacing the camshaft sensor. This step helps reset the vehicle's diagnostic system so that the new sensors can be recognized and operate correctly.
The OBD-II (On-Board Diagnostics) scan tool is a device used to read and clear vehicle diagnostic system error codes. Connect the OBD-II scan tool to the vehicle's diagnostic port, usually located under the driver's seat or near the dashboard.
Before clearing error codes, use an OBD-II scan tool to check for current fault codes. These codes provide information about which system or component of the vehicle is having the problem. Accurately diagnosing the problem is key to ensuring a fix.
Start the vehicle, connect the OBD-II scan tool to the diagnostic port, and follow the instructions on the tool to clear error codes. Before clearing, make sure the vehicle is running so the fault monitoring system can be reset.
After clearing the error code, watch the vehicle's dashboard to make sure the "check engine" or similar warning light goes out. This indicates that the system has been reset and the vehicle's fault monitoring system is now monitoring the new sensors.
In some cases, it takes a while for the vehicle to complete all self-checks and be ready for monitoring provided by the OBD-II system. Wait a few drive cycles until the system is ready to provide accurate readings for the new sensor.
Continue to use the OBD-II scan tool to monitor the status of your vehicle to ensure no new error codes appear. If new error codes appear, additional issues may need further investigation and resolution.
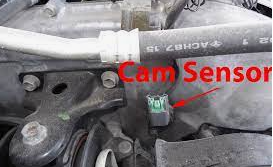
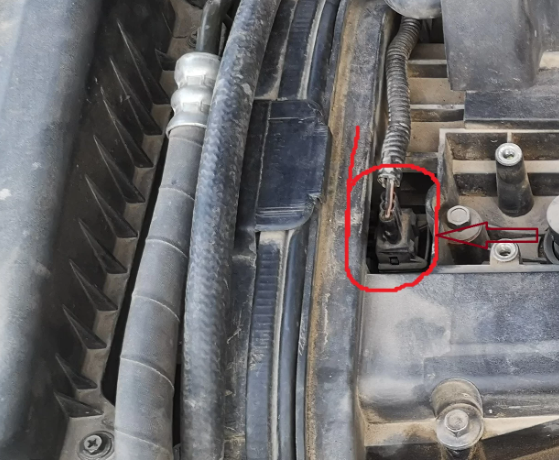
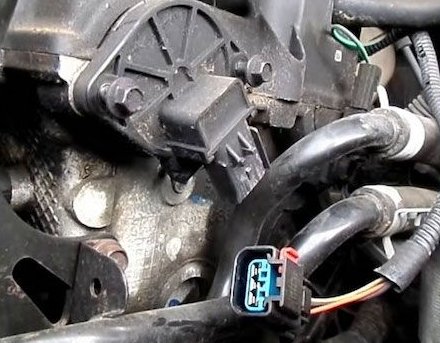
Check Wiring and Connections
First, visually inspect all wires and connections related to the camshaft sensor. Check that the cable is intact and has no obvious scratches, cuts or damage. Check that the connectors and sockets are not loose and that the connections are tight.
Pay attention to whether wires and connections are adequately protected from water. The inside of a vehicle's engine compartment is often exposed to water, moisture, and other harsh conditions, which can cause electrical shorts or failed connections. Make sure all connections are properly sealed, using waterproof tape or sealant for extra protection.
Familiarize yourself with the layout of your vehicle's engine bay and understand the location of the camshaft sensor and all the wires and connections associated with it. Sometimes, the movement or replacement of other parts may affect the accessibility of connections.
Use a Dometer (multimeter) to test the resistance of the wires and connections. This can help detect if there are conductive issues. Compare the test results to the specifications provided by the manufacturer to ensure that all resistances are within normal limits.
Check that the wire insulation is intact. Worn, cracked or broken insulation can cause wires to short out or come into contact with each other, causing electrical problems.
Check for fraying or pinching of wires, especially where they come into contact with other components. This can cause wires to break or short out.
Make sure that the sensor's bracket and the retaining clips of adjacent components are not damaged. This helps prevent the wires from being damaged by movement or vibration.
If you find any damaged wires, connectors, or other parts, replace them promptly. Repairing or replacing damaged parts can prevent future problems.
Inspect Timing
Timing refers to the synchronization of the movements of the various pistons and valves in the engine relative to the crankshaft. Accurate timing is critical to engine performance as it affects combustion efficiency, fuel economy, and overall power output.
Find the vehicle's service manual or specification sheet. These documents often contain detailed information about timing settings and adjustments, including exact markings and procedures.
Locate the timing marks on the engine. Typically, these markings are located on the crankshaft and camshaft and may refer to the parts where the timing chain or belt is used. Timing marks are often used to ensure components are in the correct position.
For some models, special tools may be required to ensure accurate timing. This may include a timing light, camshaft locking tool, or crankshaft locking tool. These tools help keep the engine stationary while adjusting timing.
Make sure the replacement camshaft sensor is installed correctly and that its location matches the manufacturer's specified location. The exact position of the camshaft sensor is very important for correct timing.
If the vehicle uses a timing belt or chain, check its condition and tension. A worn or loose belt/chain can cause inaccurate timing, which can affect engine performance.
If the inspection reveals that the timing is inaccurate, make adjustments according to the guidelines provided by the manufacturer. This may involve loosening the adjusting bolt, adjusting the timing, and then retightening.
After adjusting the timing, start the engine and conduct a short test drive. Pay attention to engine response, smoothness and fuel economy. If any abnormalities are found, the timing may need to be rechecked and adjusted.
Regularly checking timing is part of keeping your engine running at its best. This is especially important because timing system inaccuracies can develop over time and cause problems over time.
Test Drive
Before starting a test drive, make sure the vehicle's engine has warmed up sufficiently to ensure the sensors are functioning properly. Also, make sure the vehicle is parked on flat ground and away from any obstacles to avoid accidents.
Start the engine and watch for any unusual starting sounds or vibrations. Normal startup indicates that sensors and other systems are working properly.
After exiting the garage or parking lot, accelerate smoothly. Notice whether the vehicle's acceleration response is smoother and more powerful. Unusual accelerated response may indicate that a problem persists.
Drive at various speeds, including city roads and highways. Observe the vehicle's performance under various driving conditions to ensure there are no squeaks, vibrations or loss of power.
Listen for unusual noises from the engine, transmission and suspension. A faulty camshaft sensor may affect the normal operation of the engine and cause unusual sounds.
Pay attention to the vehicle for unusual vibrations, especially when idling or driving at low speeds. Vibration could be a sign of improper sensor installation or other mechanical problems.
Throughout the test drive, keep an eye on the warning lights on the dashboard. Make sure the Check Engine light or any other unusual lights are not on. If the light comes back on, further inspection may be needed.
Perform a brake test to ensure the brake system is functioning properly. A faulty camshaft sensor can affect engine combustion, which can affect brake system performance.
If the vehicle has an automatic transmission, test the transmission for smoothness. Abnormal sensor operation may affect the transmission's shift timing and smoothness.
At the end of the test drive, stop the vehicle and turn off the engine. Double-check the dashboard for any warning lights and for any unusual leaks of coolant, oil, or other fluids.
Monitor OBD-II Readings
Connect the OBD-II scan tool to the vehicle's OBD-II diagnostic port. This is usually located under the driver's seat or near the dashboard. Make sure the vehicle's power is on and running.
Select "Live Data" mode on the OBD-II scanning tool. This will allow you to monitor real-time readings from various sensors and systems.
Find data parameters related to the camshaft sensor. This may include camshaft position, camshaft speed, sensor voltage, etc. Make sure the readings for these parameters are within normal limits.
Pay special attention to the real-time position and speed readings of the camshaft. These readings should remain stable while the engine is running and should not have unusual fluctuations. Fluctuating or erratic readings may indicate a problem with the sensor or sensor circuitry.
In addition to data from the camshaft sensor, other parameters related to engine performance and emissions are monitored, such as oxygen sensor readings, fuel system status, etc. This helps to fully assess the health of the vehicle.
If possible, record readings of real-time data. This can provide useful information for future comparisons so you can keep track of the vehicle's condition.
Check the historical trouble codes on the OBD-II scan tool to make sure no new error codes appear after replacing the camshaft sensor. Historical trouble codes may provide information about problems that occurred in the past.
Compare readings from real-time data to specifications provided by the manufacturer. This helps determine if the reading is within normal range.
If you notice any unusual readings or unexplained problems, it's best to consult a professional auto technician. They can further analyze the data and provide accurate diagnosis and repair recommendations.
Adaptation/Relearn Procedure
The purpose of the adaptation or relearning program is to adapt the vehicle's electronic control unit (ECU) to the new sensor and ensure its normal operation. This can include adjusting engine control parameters, optimizing performance and adapting to the characteristics of new components.
First, consult your vehicle's service manual. The manufacturer usually provides information in the manual on whether an adaptation or relearning procedure is required after replacing a specific sensor. This is an important way to understand the specific requirements of your vehicle.
If the manual does not provide clear information, use an OBD-II scan tool to check if relevant adaptation or relearning options exist. Some vehicles can be adapted via OBD-II systems, while other models may require specialized diagnostic tools.
If you are unsure whether an adaptation/relearning procedure is required, it is recommended to consult a professional automotive technician or an experienced mechanic. They may be able to provide advice on your specific vehicle based on their experience.
If adaptation or relearning is determined to be necessary, follow the appropriate procedures according to the guidelines provided by the manufacturer. This may involve putting the vehicle into a specific driving mode, starting and stopping a certain number of times, or performing other actions in a specific sequence.
After completing the adaptation/relearning procedure, conduct a test drive and use the OBD-II scan tool to monitor relevant parameters to ensure that the vehicle performs normally and that no new error codes are generated.
Continuously monitor the vehicle's performance and ensure nothing unusual is occurring. If problems occur after performing the adaptation/relearning procedure, further inspection and adjustment may be required.
Ensure Proper Lubrication
Before replacing the camshaft sensor, consult your vehicle's service manual. Manufacturers often provide detailed information about the lubrication needs of the camshaft sensor in their manuals. This may include the type of lubricant that needs to be used and the location of the lubrication.
Understand the design of the camshaft sensor to determine if lubrication is required. Some sensors may have lubrication requirements, while others may be a closed design that does not require additional lubrication.
If the manufacturer recommends using a lubricant during installation, be sure to choose the appropriate type. In general, use lubricants recommended by the manufacturer to avoid conditions that are incompatible with the sensor material or cause failure.
When installing the camshaft sensor, make sure lubricant is correctly applied to the areas of the sensor that require lubrication. This may be the sensor's seal or contact surface, depending on the sensor design.
Avoid over-lubrication, as too much lubricant may cause excessive friction or clog the sensor, causing performance issues. Follow the manufacturer's recommendations carefully to be sure to use the proper amount of lubricant.
After lubrication, be sure to remove any excess lubricant, especially if it may have dripped onto other engine components or electrical connectors. Excess lubricant may cause contamination or cause other problems.
After lubrication is complete, perform a test to make sure the camshaft sensor is working properly and has no abnormal readings or malfunction lights coming on.
Inspect Other Components
When replacing the camshaft sensor, it is a wise idea to inspect other related components, such as the crankshaft sensor, to look for any signs of wear or damage.
Before you start checking other components, consult your vehicle's service manual for information about the crankshaft sensor and other related components. Manuals often provide detailed guidance on location, specifications and maintenance requirements.
Confirm the location of the crankshaft sensor and check for any visible issues around it. The crankshaft sensor is usually mounted in a fixed location on the engine, close to the crankshaft.
Check the crankshaft sensor cables and connections to make sure they are not damaged, cut, or loose. Similar to the camshaft sensor, a good crankshaft sensor connection is critical to proper operation.
Check the appearance of the sensor itself for any physical damage or leaks. These issues can affect sensor performance.
Use a Dometer to test the resistance of the crankshaft sensor. As with the camshaft sensor, make sure the resistance value is within the normal range specified by the manufacturer.
Use the OBD-II scan tool to monitor real-time data from the crankshaft sensor and check the stability and accuracy of the signal. Any unusual readings may be an indication of sensor failure.
Make sure the crankshaft sensor mounting position and bracket are not loose or damaged. Problems with these parts can cause sensor instability.
If you find a problem with the crankshaft sensor during inspection, use an OBD-II scan tool to clear the error code and watch to see if it regenerates.
During the inspection, consider the vehicle's maintenance schedule and check for other components that may need attention, such as engine belts, tires and brake systems.
Remember that these steps are general guidelines, and it's crucial to refer to your vehicle's specific service manual for detailed instructions and specifications. If you're not comfortable or experienced with these procedures, it's advisable to consult a professional mechanic for assistance.
Symptoms of a Bad Camshaft Sensor
A faulty camshaft sensor can cause a variety of symptoms that may negatively impact the performance of your vehicle.
Check Engine Light Illumination: One of the most common signs is the illumination of the check engine light on the dashboard. The vehicle's onboard computer (ECU) detects irregularities in the camshaft sensor's signal and triggers the warning light.
Poor Engine Performance: A bad camshaft sensor can lead to poor engine performance. You may experience rough idling, stalling, or hesitation during acceleration. The engine may not run smoothly, and there could be a lack of power.
Difficulty Starting the Engine: A failing camshaft sensor may result in difficulty starting the engine. You may notice increased cranking time or the engine may not start at all.
Reduced Fuel Efficiency: Issues with the camshaft sensor can affect the engine's timing and combustion, leading to reduced fuel efficiency. You may notice a decrease in miles per gallon (MPG).
Engine Misfires: Misfires in the engine cylinders can occur due to inaccurate camshaft sensor readings. This can lead to a noticeable loss of power and performance.
Stalling While Driving: In severe cases, a faulty camshaft sensor may cause the engine to stall while driving. This can be dangerous, especially if it happens at high speeds or in traffic.
Poor Acceleration: Acceleration may feel sluggish or uneven when the camshaft sensor is not functioning correctly. The engine may not respond promptly to throttle inputs.
Unusual Engine Sounds: A malfunctioning camshaft sensor can result in irregularities in the engine's timing, causing unusual sounds such as backfiring, popping, or a ticking noise.
Increased Emissions: Problems with the camshaft sensor can lead to higher emissions as the engine struggles to maintain proper combustion. This may cause the vehicle to fail emissions tests.
Transmission Issues (in some cases): In vehicles with automatic transmissions, a faulty camshaft sensor may affect the transmission's shift points and smoothness.
When to Replace the Camshaft Sensor
How to Replace the Camshaft Sensor
The replacement process for the camshaft position sensor involves several crucial steps to ensure a safe and effective procedure.
Disconnect the Battery:
Prioritize safety by disconnecting the negative terminal of the battery. This precautionary measure prevents electrical accidents during the replacement process.
Loosen and Disconnect the Connector:
Loosen the camshaft position sensor (CMP) connector from its bracket and disconnect the electrical connector. Carefully handle the connector to avoid any damage during the disconnection process.
Release the Sensor Line:
Release the camshaft position sensor (CMP) line from its buckle, ensuring that it is free from any constraints that may impede the replacement process. Properly releasing the sensor line allows for easy removal.
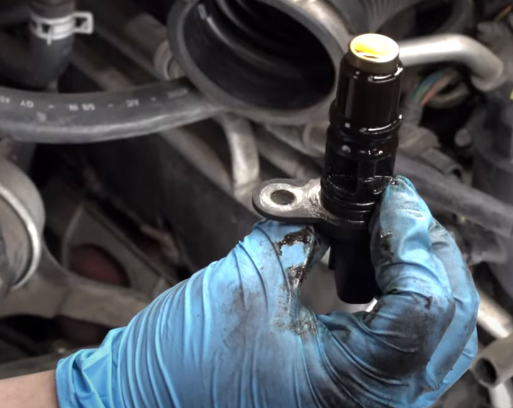
Unscrew and Remove the Sensor:
Proceed to unscrew the screws securing the camshaft position sensor (CMP). Exercise caution and precision during this step to prevent damage to the sensor or surrounding components. Carefully remove the sensor from its mounting position.
Installation of New Sensor:
When replacing the camshaft position sensor, carefully install the new sensor in the reverse order of removal. Ensure that the sensor is securely mounted and the screws are tightened appropriately.
Reconnect the Sensor Line and Connector:
Reconnect the camshaft position sensor (CMP) line to its buckle and secure it in place. Reconnect the electrical connector to the sensor, making sure it is properly seated and secured.
Reconnect the Battery:
Reconnect the negative terminal of the battery to restore power to the vehicle. This step is essential for testing the new sensor and ensuring its proper functionality.
Final Words
In conclusion, knowing what to do after replacing the camshaft sensor is key to a successful and trouble-free operation of your vehicle. From clearing error codes and monitoring OBD-II readings to conducting a thorough test drive, each step plays a role in verifying the effectiveness of the replacement.
Read More:
What to Do After Replacing Crankshaft Sensor
What happens if you disconnect throttle position sensor
How to calibrate a throttle position sensor
FAQ
Do you have to reprogram a camshaft sensor?
Replacing a camshaft position sensor typically involves a plug-and-play process, with no direct need for reprogramming. However, some vehicles may require adaptation or relearn procedures to ensure the Engine Control Module (ECM) adjusts to the new sensor. Clearing error codes, conducting functional testing, and seeking professional advice contribute to a comprehensive post-replacement approach. While a reset in the traditional sense may not be needed, attention to these steps ensures the seamless integration of the new camshaft position sensor, optimizing engine performance.
Why won't my car start after replacing the camshaft position sensor?
The inability of your car to start after replacing the camshaft position sensor could stem from various issues. Several factors need consideration, including the possibility of a defective or incorrect replacement part, improper installation, faulty wiring, or a misdiagnosis that led to the replacement of a component that wasn't the actual source of the problem. It's crucial to reflect on whether the vehicle was starting before the camshaft sensor replacement. If it was, reinstating the original sensor may be a prudent step. This underscores the importance of accurate diagnostics, correct parts, and precise installation to ensure the effective resolution of issues in your vehicle's starting system. If challenges persist, seeking professional assistance for a thorough inspection and diagnosis is advisable.
What happens if you don't relearn a camshaft sensor?
Not conducting a relearn process after replacing a camshaft sensor can have adverse effects on the engine's performance. In rare instances, the engine may misfire or enter a "reduced power" or "limp mode," particularly during high RPM/load conditions. This can lead to a significant decrease in overall vehicle performance. Additionally, the omission of the relearn process may result in the vehicle being unable to pass emissions tests due to an incomplete or failed misfire monitor.
Should you disconnect the battery when changing the camshaft position sensor?
Yes, it is a recommended practice to disconnect the battery when changing the camshaft position sensor.
What kills a camshaft sensor?
The camshaft sensor can fail due to various reasons, including mechanical damage from impact or vibration, breaks in the encoder wheel disrupting position detection, internal short circuits, exposure to excessive heat or temperature fluctuations, oil or fluid contamination, and issues with wiring or connectors. Incorrect installation, such as misalignment or insufficient tightening, can also contribute to sensor failure.
What is the code P0340 after replacing the sensor?
Code P0340 signals a potential issue with the electrical circuit connected to the camshaft position sensor. Despite replacing the sensor, the persistence of this code suggests an ongoing problem with the wiring or electrical components associated with the sensor. This malfunction can trigger additional fault codes directly related to the camshaft in your vehicle. Furthermore, the continued presence of P0340 may indicate potential damage to the powertrain control module (PCM), necessitating a comprehensive inspection and potential repairs to rectify the underlying electrical issues and ensure the proper functioning of the camshaft position sensor.
What happens if you keep driving with a bad camshaft position sensor?
If the cam sensor is the sole input for the Engine Control Module (ECM) to control spark plugs or fuel injectors, the engine may not start at all. However, if the engine starts and runs reasonably well despite the faulty sensor, you can technically continue driving. However, there are potential drawbacks, including increased fuel consumption, higher emissions, and the risk of damaging the catalytic converter over time.
How much does it cost to replace the camshaft sensor?
The cost to replace a faulty camshaft position sensor can vary depending on several factors, including the make and model of the vehicle, labor costs in your region, and so on. On average, the replacement cost can range between $100 and $300.


Still, need help? Contact Us: [email protected]